Mix and match pencil skirt

different fabrics

I will always have a reason to stash small pieces of leftover fabrics and I believe my excuses are truly valid.  I use leftovers for linings, for contrast trims, for covering buttons, for bows or any other detail I can think of.  Possibly not everyone in our family shares this love, but I love going trough my bits and pieces.  My new pencil skirt is about mixing and matching fabrics within the same colour range.  I used this black and white cotton flower print, mixed with some leftover uni cotton for the waistband and lace to make this design.  At the waistband I sewed on two strokes of a vintage lace ribbon which I found at the fleamarket of ‘Porte de Clignancourt’ years ago.  You see, eventually everything will get its purpose!

IMG_7106B

IMG_7138B

sewing machine

rokjeIMG_7175

Easy pattern DIY: For this skirt I made a slant cutting into a basic skirt pattern .  That’s it!


And one for my instagram followers 😉

mix and match skirt fitting


Standard

Refashion fashion

70’s revival that seamed hot when I was in my twenties made me buy this vintage dress years ago at a thrift store.  It seemed to reappear every now and again but I never wore it so this means something’s wrong.  I can’t help it, and my husband keeps telling me I should, but throwing away clothes is against my nature and everything I stand for. This dress is made by someone once, I can tell by the way it was stitched it was not from a retailer and maybe that someone shared the same passion for fabrics and sewing as I do.  It makes me nostalgic but after all these years this piece of clothing will be ‘remade by me’.

DeocrativeScissors-0610

This is what’s left of my seventies dress after cutting and sewing… see the result below!

leftover dress

sewing machine

I used the basic pencil skirt pattern I made before and just added a waistband, side pockets, a new lining and some pleats at the middle back.

IMG_6193

IMG_6194


IMG_6207

IMG_6214

IMG_6216

The paisley woven fabric is amazing, isn’t it?  I love these kind of fabrics!  I did go all the way with this recycling dress, I even reused the old metal zipper for my new pencil skirt and I still had enough leftovers to create a diamante flower belt.  I have this crazy obsession with belts, I wear a different one every day, one more to add to my collection…

silver lame flowers

Follow my  instagram pics and see what I’m up to!

silver lame skirt2


Standard

Asymmetric skirt

assymetric skirt tutorial

This is the first adaptation from my Basic Pencil skirt pattern I made a few weeks ago.  It’s all about showing you how easy it can be to start from there and create the skirt of your dreams.  I like asymmetric shapes but as keeping it easy is always my intention, I used a draped front you can close with hooks.  You don’t need to install  complicated zippers or buttons and I think sewing on a hook is very relaxing. You could do this sitting in your sofa, enjoying the last stiches sewn on by hand and say with satisfaction: This is Made By Me!

DeocrativeScissors-0610

Dit is de eerste adaptatie van mijn basis kokerrokje dat ik enkele weken geleden postte. Ik wil je tonen hoe eenvoudig het kan zijn om vanuit deze basis te starten en uiteindelijk het rokje van je dromen te realiseren.  Ik hou van asymmetrische vormen maar het blijft nog steeds de bedoeling om het gemakkelijk te houden, en dat doe ik door mijn gedrapeerde voorzijde te sluiten met haak en oog.  Je hoeft dus geen ingewikkelde ritsen of knoopsluitingen te maken en een haakje aannaaien is best ontspannend.  Je kan dit doen in je luie zetel, genietend van de laatste steekjes aan je rokje en met voldoening zeggen: dit is Made By Me!

sewing machine

IMG_4614 IMG_4612

1) copy the pattern from my basic pencil skirt and reduce length evenly on front and back.

Ik kopieer het patroon van mijn basis kokerrokje en verkort gelijkmatig aan voor en rugpand.

IMG_4618 IMG_4620

2) I translate my design onto the pattern.  There is no tip other than trying untill you get the proper proportions.

Ik vertaal mijn ontwerp naar het patroon.  Ik kan hier geen tips geven behalve dat je blijft proberen tot de proporties er goed uit zien.

assymetric skirt drawing

IMG_4622 IMG_4626 IMG_4630

IMG_4632 IMG_4634

3) This is an assymetric skirt so the right side is pleated and the left side stays plain with extra overlap added.

Het is een asymmetrisch rokje dus de rechterzijde wordt geplooid en de linkerzijde heeft enkel extra overlap breedte .

IMG_4639

4) Cut off 3cm from the top of all pattern pieces to make a separate waistband.  I copy these parts and add seam allowance.

Snij 3cm weg van het bovenste gedeelte van elke patroondeel voor de tailleband.  Ik kopieer deze delen en voeg naadwaarde toe.

IMG_4669 IMG_4672

5) cut all pieces out of fabric and lining.  Sew sideseams and double the skirt.  Turn inside out and iron.  Attach waistband.

Knip alle patroondelen uit in stof en voering.  Naai zijnaden dicht en doubleer het rokdeel.  Draai binnenstebuiten en strijk.  Bevestig de tailleband.

Heb je ook zin in om je eigen creatie te maken?  Binnenkort gaat onze workshop van start gebaseerd op het basisrokje dus schrijf je in en laat je volledig gaan

Standard

The basic pencil skirt pattern

tutorial basic skirt

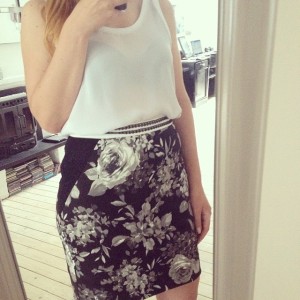
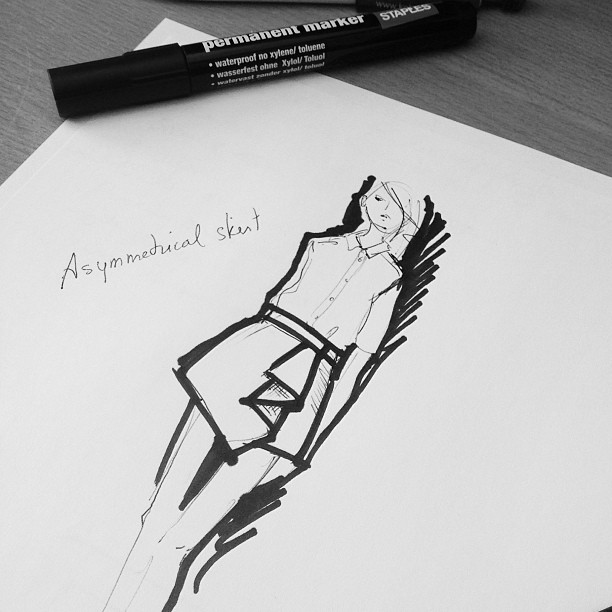
I already promised this a few weeks ago on my Facebook page and finally here it is: the basic pencil skirt pattern.  This is a must have to make most skirt designs and absolutely easy to make.   A rectangle will form the basis again for this easy pattern,  based on the measurements of my hips , I add darts at the waist et voila: skirt finished!  I had to make some adjustments after sewing the first skirt because it was too wide at the waist.  Once the fitting is perfect, I can try out new skirt lengths, asymmetric hems, add seams or create different volumes. I hope to show you some interesting modifications very soon but for now I enjoy the simple cut of this basic pencil skirt.

DeocrativeScissors-0610

Zoals ik al een paar weken geleden beloofde op mijn Facebook pagina is het nu eindelijk daar: het basis kokerrok patroon.  Dit patroon is onmisbaar als basis voor de meeste rokontwerpen en absoluut éénvoudig.  Een rechthoek zal opnieuw de basis vormen van dit eenvoudig patroontje gebaseerd op de omtrek van mijn heupen , daarna wat nepen toevoegen in de taille en voila, rokje klaar!  Ik geef toe dat ik het patroon wat moest aanpassen want het was me ietwat te breed.  Eens ik de perfecte pasvorm heb kan ik spelen met roklengtes, asymmetrische zomen, naden toevoegen en andere volumes creëren.  Alles is mogelijk en ik hoop jullie snel een aantal interessante varianten te tonen maar nu geniet ik van de eenvoudige snit van deze basis kokerrok.

sewing machine

pattern pencil skirt  paspop rok

A= Waistline : 4 + 0,25cm (make 0,5cm smaller for cotton stretch)

B= Hip width : 4 + 0,5cm (make 0,5cm smaller for cotton stretch)

C= distance between hips and waist

(Tip: don’t stretch the meter too tight around waist and hips)

IMG_2885

1) Make 2 rectangles starting from width B (hips): 1st rectangle=half front + 2nd rectangle= half back.  Go down from A with length C to mark the hipline B  

1) Maak 2 rechthoeken op breedte B (heupen): 1ste rechthoek=een halve voorzijde + 2de rechthoek= een halve rug.  Ga vanaf lijn A naar onder met lengte C om de heuplijn B te bepalen.

IMG_2908  pencil skirt back

2) Add darts and curve the side seams to shape the waist A.  The difference between hips (B) and waist (A) will determine the width of the darts, darts are longer and wider at the back. (later on I changed the pattern and used 2 darts at the back because the difference between my waist and hips was too big) Dropp the waist A by 1cm at the center front and 0.5cm at the back, create a curve for a more natural waistline.

2) Voeg neepjes toe en rond de zijnaad af om zo een taille te vormen.  Het verschil tussen heupen (A) en taille (B) zal de breedte van de nepen bepalen, nepen zijn dieper en breder op de rug. (ik heb nadien het patron aangepast en 2 nepen gebruikt omdat het verschil tussen mijn heupen en taille te groot was)  Ga 1cm naar beneden op middenvoor A en 0,5cm op middenrug A.  Voor een meer natuurlijke belijning in de taille krijgt lijn A een zachte ronding.

IMG_2912

3) Choose a good length for your skirt. (measure from waist A down).

3) Kies de juiste lengte voor je rok.  (meet vanaf taille A naar onder toe)

IMG_2913

If the fabric doesn’t stretch you can make a vent at the centerback. – Als je stof niet rekt kan je opteren voor een split op de middenrug

IMG_2915  IMG_2914

4) Ad seam allowance, 4cm for the hem and 1cm for all other seams.  No seam allowance at center front, the pattern is placed at the fabric fold.

4) Voeg naadwaarde toe, 1cm voor alle naden en 4cm voor de zoom. Er is geen naadwaarde nodig op midden voorpand, het patroondeel wordt tot tegen de stofvouw gelegd.

IMG_2922  IMG_2924

5) Make a facing for the waist by copying the waistline A and go down by 8cm.  Close the darts with tape and make a soft curvy line.  Add 1cm seam allowance.

5) Maak een beleg voor de taille door het patroon te kopiëren vanaf de taille A tot 8cm naar onder.  Kleef de nepen dicht met papiertape en herteken tot een zachte afgeronde vorm.  Voeg 1cm naadwaarde toe.

IMG_2926

The pattern is finished, now you can start sewing.  The back will need a zipper and you can find a lot of great blogs on how to do this.  I advise you to finish al seams with a zigzag before stitching the skirt.

Het patroon is klaar, nu kan je starten met naaien.  Er zal een rits nodig zijn op middenrug en met reeds een hoop fantastische blogs over dit onderwerp zal dit geen probleem meer geven. Ik raad je aan alle patroondelen eerst te zigzaggen vooraleer het rokje in elkaar te stikken

Good zipper tutorials:

Englisch (www.makeit-loveit.com)

Dutch (www.madamezsazsa.blogspot.be)

* I’m still looking for good tutorials on invisible zippers, let me know if you have a good one!

Standard